Validation – Page 2 – The Oil Money
Archive
Blog Archives

TOW University

How-To videos, additional resources, useful and helpful tips.

We recommend watching the videos in full view HD.

1

Charts 1

3

Beginner 1

5

Beginner 3

7

Entry 1

9

Settings Update 08.15.14

11

Trade System Concept 1

13

Trade System Concept 3

15

50% Win / Loss Ratio

17

Live Training 1

19

Webinar : Randy Part 1

2

Charts 2

4

Beginner 2

6

Trading Hours

8

Entry 2

10

Secondary Signals

12

Trade System Concept 2

14

Trader Adjustable Settings

16

BRN & NG

18

Quick Scalp 1

20

Webinar : Randy Part 2

TOW Settings

Below are two settings you can use to setup your TOW 3.0. The first setup is your Basic setup and is ideal / recommended for you to use with your TOW 3.0. The second setup is the Fast Chart setup, this is an optional setup for those who are comfortable with a faster chart and its results.

This Basic setup is ideal and suggested for you to use with your TOW 3.0.

Basic Chart for TOW 3.0

Settings to Use

ALERTS SECTION
AlertsMessage: TRUE
AlertsOn: TRUE
AlertsSound: TRUE

BAND SECTION
ATRMultiplier: 1.2
TMAPeriod: 67

Parameter Section
TrendMultiplier: 1.7

Basic Chart for TOW 4.0

Settings to Use

ALERTS SECTION
AlertsOn: TRUE


Step 1 : Open the Indicators Window

To apply / set your Indicator, open the Indicators Window. You can do this one of 3 ways: 1.) Right click on chart - select Indicators, 2.) Use hotkeys: CTRL + i , or 3.) Click on the Indicators icon at the top of the chart

Step 2 : Modifying the Settings

NOTE: Be sure you clicked on Pivot Scalper in the bottom left section of the Indicators window to be able to modify the settings. Use the image above and the Settings (provided to the right of image) to modify and match your settings.

Step 3 : Applying Your Settings

After you've updated / modified the settings as instructed, click on the APPLY button at the bottom of window and then click OK to close it. The chart will reload with the new settings.


FAST Chart for TOW 3.0

Settings to Use

ALERTS SECTION
AlertsMessage: TRUE
AlertsOn: TRUE
AlertsSound: TRUE

BAND SECTION
ATRMultiplier: 0.7
TMAPeriod: 47

Parameter Section
TrendMultiplier: 1.4

FAST Chart for TOW 4.0

Settings to Use

NONE


Step 1 : Open the Indicators Window

To apply / set your Indicator, open the Indicators Window. You can do this one of 3 ways: 1.) Right click on chart - select Indicators, 2.) Use hotkeys: CTRL + i , or 3.) Click on the Indicators icon at the top of the chart

Step 2 : Modifying the Settings

NOTE: Be sure you clicked on Pivot Scalper in the bottom left section of the Indicators window to be able to modify the settings. Use the image above and the Settings (provided to the right of image) to modify and match your settings.

Step 3 : Applying Your Settings

After you've updated / modified the settings as instructed, click on the APPLY button at the bottom of window and then click OK to close it. The chart will reload with the new settings.

TOW Validation

Validating and Setting the Indicator to a New Chart

Step 1 : Launch NinjaTrader Software / Application

Launch your NinjaTrader software / application. The first window it brings up is the Control Center.

Step 2 : Connect to Your Data Feed Provider

You will need to be successfully connected to your Data Feed provider so that your charts will populate with candles. Follow this path.

CONTROL CENTER >> FILE >> CONNECT >> (select your provider)​

Your Data Feed Provider

This is something that needs to be established when you have installed NinjaTrader's software / application. If you have not done this, please refer to the Activation Process >> Step 2.

Step 3 : Open a New Blank Chart

In the Control Center window, click on FILE >> NEW >> CHART

Step 4 : Data Series Window

The Data Series window will automatically open. You will need to select an instrument to put in the chart. You can select ANY instrument you want. Ideally, just to get the Validation and Setting done, pick: CL or ES or NQ.

Selecting an Instrument

From within the top left section of the Data Series window, click on the instrument of your choice, just once. Then down below click NEW. You will see the instrument you picked is now showing in the bottom left section of the Data Series window.​

Step 5 : Validating Your Indicator

You will need to validate your indicator in order to use it on a chart. With the DATA SERIES WINDOW still open, go to the top right section labeled: PERIOD, there you will modify the TYPE. To modify the TYPE, click on MINUTE (to the right of TYPE) to enable the drop down menu.

Selecting an Instrument

In the drop down menu scroll down to locate the indicator: TOMbars. Click on TOMbars.

Your Validation Code

For this next step you will need your The Oil Well 3 (TOW3) validation Code provided below.

IMPORTANT: If you have more than one machine ID activated, then pay close attention to which code is assigned to which machine ID.

Your Product Information

Name:
Email:

Machine ID 1:


TOW3 TOMbars Code:


Machine Type 1:

Machine ID 2:


TOW3 TOMbars Code 2:


Machine Type 2:

IMPORTANT!! Each computer must have it's machine ID activated to use our products.
If you have not been activated please do so now.

Entering Your Validation Code

You can enter the validation by copy & pasting.

Validation Code - Copying

Simply DOUBLE CLICK on the Code, to highlight. Once it is highlighted you may copy it one of two ways:

  • Right click on the hightlight to open the menu options and select COPY
  • Hotkeys: CTRL + C [to copy]; then release

Either way will copy whats highlighted.

Now to Enter the Validation Code

In the PERIOD section, look for the row labeled: BRICK SIZE. By default it is set to 5. You will enter the Code here. Remove the 5 and enter (paste) the Code - be careful to not add any blank spaces before or after the code, this will make the validation process not work correctly.

Pasting the Validation Code

You can paste the code one of 2 ways:

  • Hotkeys: CTRL + v [to paste]; then release, or
  • You can manually enter the numbers into the box
  • DO NOT TRY TO RIGHT CLICK IN THE BOX, it will not allow you to do it.

Completing the Validation Process

After you've entered the Code, on the bottom left of the DATA SERIES window is the OK button. Click OK to close the window. This will also trigger the chart to pull the data feed from your provider and populate the chart with candles.

Having an issue?  Troubleshoot it with the helpful tips and resources below.

I'm getting a blank Chart

I cannot find TOMbars

I'm getting an error pop up message

Step 6 : Setting the Indicator to the Chart

After you've completed the Validation process you can move onto putting the Indicator to the chart.

Step 7 : Open the Indicators Window

To apply / set your Indicator, open the Indicators Window. You can do this one of 3 ways:

  • Right click on chart - select Indicators
  • Use hotkeys: CTRL + i
  • Click on the Indicators icon at the top of the chart

Step 8 : Locate Your Indicator

Top left section of the Indicators window, scroll to find the Indicator: TOM_TOW3 OR TOM_TOW4.

Applying / Setting the Indicator

Click on the Indicator once and at the bottom - click on NEW. You will now see the Indicator appear in the bottom left section of the Indicators window.

Completing the Indicator Process

To complete the Indicator process, you will want to click on APPLY at the bottom of the Indicators window. This will apply the Indicator to the chart. Now click on OK to close the window.

Step 9 : You're Finished with the Installation and Validation Processes

It is always a good habit to relaunch your NinjaTrader just after importing a new .zip file. Shut down and exit your NinjaTrader. As NinjaTrader shuts down, a window will pop up giving you options to save or not save. You will need to select YES TO ALL. This will allow NinjaTrader to register the newly installed (imported) .zip files.

TOW Installation

DOWNLOAD & INSTALL

Step 1 : Download the .ZIP File(s)

Download all the .zip file to your local machine (computer). If you are prompted with an option to save, select "SAVE AS" so that file is saved with its original name. NEVER OPEN OR UNZIP THE .ZIP FILE.

TOW v4.0.1 [Release Date: 07.30.15]


Download file contains the following Indicator: TOW4

REMEMBER!!! NEVER OPEN OR UNZIP THE .ZIP FILE.

Step 2 : Locate the .ZIP File

To prepare yourself for the installation (import) process, you will need to know where you downloaded the .zip file. Take a moment to locate them in your computer. Make a (mental) note where you found them, you will need them later in the install (import) process.

Step 3 : Launch NinjaTrader Software / Application

Launch your NinjaTrader software / application. The first window it brings up is the Control Center. It is here, in the Control Center, you will import the .zip file.

Step 4 : Import the .ZIP File(s)

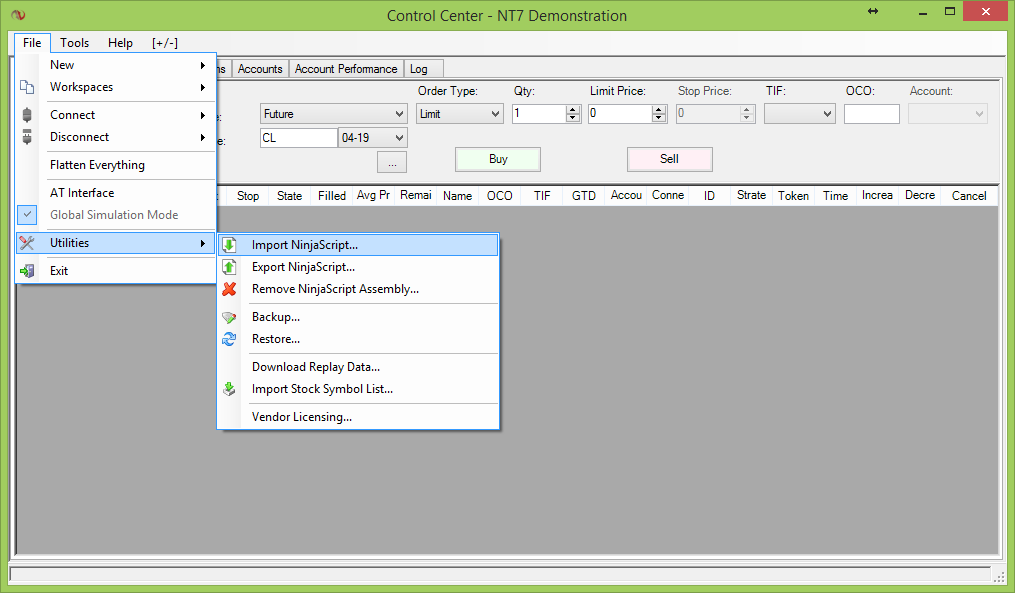
In the Control Center window, click on FILE >> UTILITIES >> IMPORT NINJASCRIPT.

CLICK TO ENLARGE

Step 5 : Pop-up Message During Import

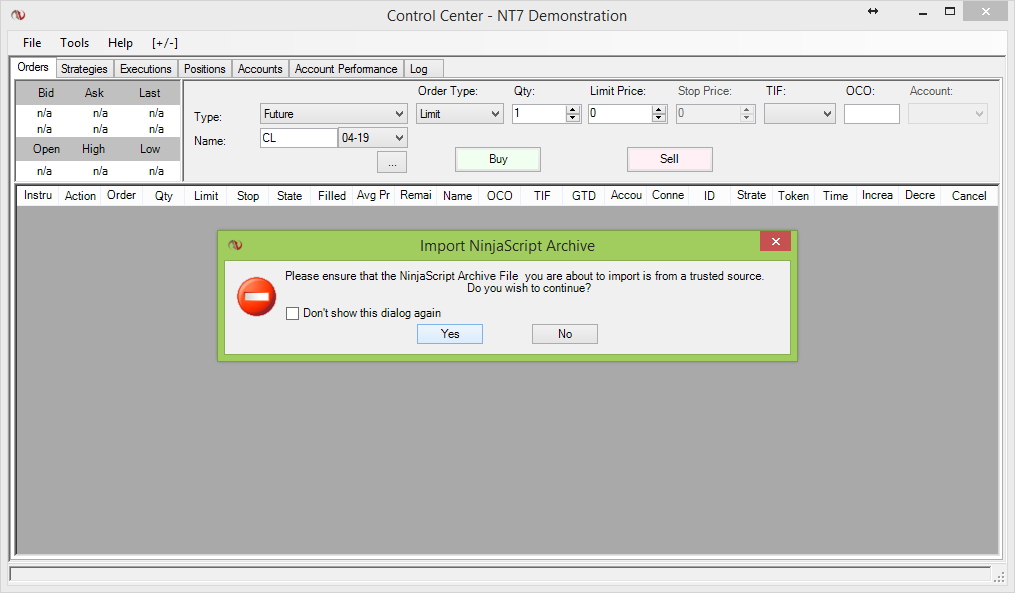
By NinjaTrader default a message window will pop up with a general warning about importing file. Click on YES.

CLICK TO ENLARGE

Step 6 : Locate the .ZIP File(s) You Downloaded

A new window will open for you to locate the .zip file. Click on the .zip file you wish to install and at the bottom of the window click OPEN. The window will disappear and this will trigger the installation into NinjaTrader.

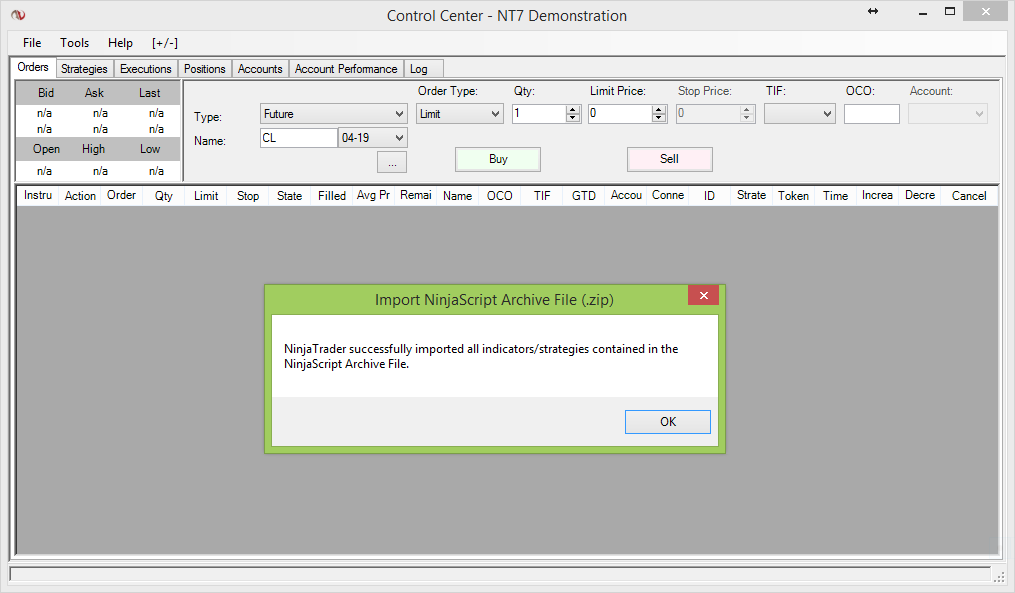
CONFIRMATION OF INSTALLATION (IMPORT): NinjaTrader will pop up a message confirming the import was successful.

CLICK TO ENLARGE

ERROR OCCURS WHEN IMPORTING (INSTALLING): If you receive an error when installing (importing) the .zip file, then you will want to take a snapshot of the error and submit a ticket with NinjaTrader's Support. You will want to give NinjaTrader's Support an opportunity to resolve the issue that created the error. You can reach NinjaTrader's Support via their site >> NinjaTrader Support

After you have resolved your issue with NinjaTrader's Support, you may continue to the next step in your installation process.

Step 7 : Got More than One .ZIP File to Import (Install)

If you have to install (import) other .zip file(s), then you need to REPEAT STEPS 4-6 for each .zip file.

Step 8 : Installation (Import) of .ZIP File(s) Completed

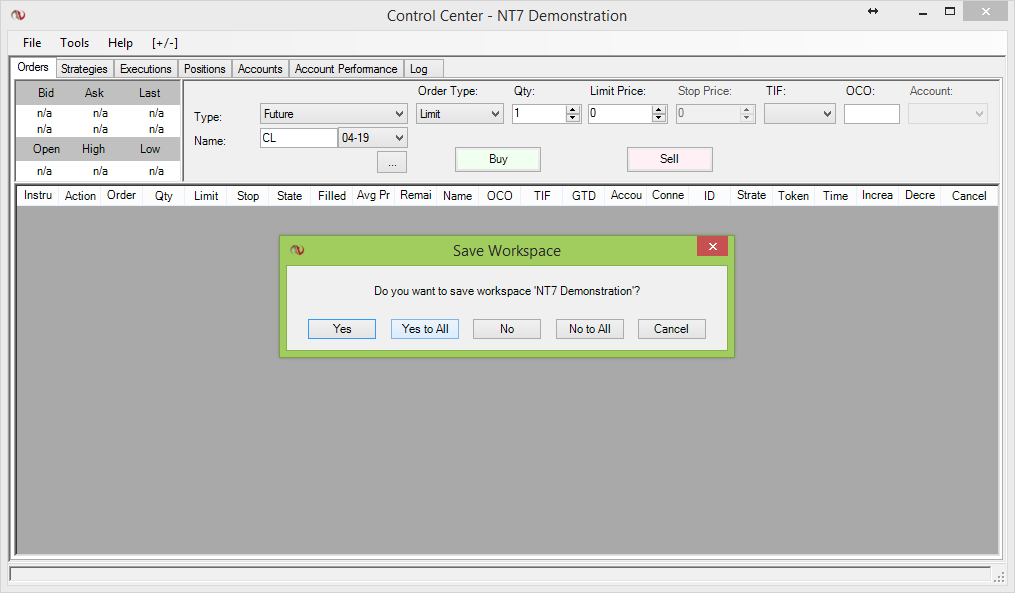
It is always a good habit to relaunch your NinjaTrader just after importing a new .zip file(s). Shut down and exit your NinjaTrader. As NinjaTrader shuts down, a window will pop up giving you options to save or not save. You will need to select YES TO ALL. This will allow NinjaTrader to register the newly installed (imported) .zip file(s).

CLICK TO ENLARGE

>